
CDI XP™ 301 MC Digital Analog with advancer system
Manual Book
CDI XP 301 MC ® ADVANCER SYSTEM
(Digital Adjustable Advancer Timing)
SPECIAL TECHNOLOGY FOR YOUR MOTORCYCLE’S PERFORMANCE
Always read this Instruction before Installation!!
Profile of CDI XP 301 MC
CDI XP 301 MC is a CDI (Capacitor Discharge Ignition) High Power Ignition with the output Voltage to Ignition coil 375 – 380 Volt which is controlled by AVR (Automatic Voltage Regulator) in order to control the output Voltage constant up to 40,000 RPM.
The CDI XP 301 MC works with the DC (Direct Current) input voltage system. The CDI is a combined Technology from Digital and Analog sytem called ”Manual Programmable Advancer System”.
The Advancer System will let the users to set when is the degree of Ignition will get advance at the RPM they want to (from 15 degree to 32 degree BTDC)
For instance : Advance timing at RPM 2000 the timing of Ignition's Characteristic will be different if it is compared to when the users want to Advance timing at RPM 3000.
There are two (2) Indicators at CDI they are Yellow (Idle Position) and Red (Advance Position). Each characteristic can be Programmed only by using small screw driver as well, this way is the same as if the users make program of Ignition characteristics by using PC (Personal Computer), it means no need to have PC, software etc.
By using CDI XP 301 MC not only for the Drag Bike but also for Road Race or Grass Track as well.
Versions of CDI XP 301 MC
Products of CDI XP 301 MC are divided based on the length of pick-up pulser sensor at Flywheel Magnet :
1. Ver 12 = Used for motorcycles with the length of pick up pulser at Flywheel Magnet 12 mm
2. Ver 14 = Length 14 mm
3. Ver 30 = Length 30 mm
4. Ver 38 = Length 38 mm
5. Ver 38 – X = Length 38 mm (Single Negative of Ignition’s System)
6. Ver 39 = Length 39 mm
7. Ver 57 = Length 57 mm
Specifications:
Symbol Parameter Value
Vdc Volt supply Minimum 9 Volt
Normal 12.5 Volt
Maximum 15 volt
I Dc Current Consumptions 0.15- 1.5 * Ampere
ω Revolution 800 – 40000 RPM
*) Depend on condition of Coil, gap of spark plug, etc
Type of Motorcycles and recommended version of CDI XP 301 MC
Type of Motorcycles Length of pick-up pulser sensor at Fly wheel Type of signal pulser Ignition System Recommended Versions of CDI XP 301 MC
1 HONDA
Kirana 12 ± 1 mm Single – Positive DC Ver 12
Supra / Legenda, Astrea Grand 12 ± 1 mm Single – Positive AC Ver 12
Tiger 2000 12 ± 1 mm Single – Positive AC Ver 12
Mega Pro 12 ± 1 mm Single – Positive DC Ver 12
Karisma / Wave 125 / Supra 125 X 38 ± 1 mm Single – Positive DC Ver 38
Sonic 125 / CBR 150 38 ± 1 mm Single – Negative DC Ver 38 - X
2. YAMAHA
Jupiter Z / Nouvo / Mio, Jupiter MX / T135 57.5 ± 1 mm Double - Positive DC Ver 57
Vega – R / 57.5 ± 1 mm Double - Positive AC Ver 57
3. SUZUKI
Smash 110 14 ± 1 mm Double - Positive DC Ver 14
Shogun 110 14 ± 1 mm Single - Positive DC Ver 14
Shogun 125 30 ± 1 mm Single - Positive DC Ver 30
Raider 150 / Satria 150 FU 39 ± 1 mm Double - Positive DC Ver 39
Each Package consist of :
1. CDI XP 301 MC unit : 1 unit
2. Adjuster Tool : 1 unit
3. Cable set : Red 1 unit, Yellow 1 unit, Blue 1 unit, Black 2 units, Green 1 unit (Only supplied for Ver 39) / For Jupiter MX we only supply it our cable set
4. Manual Book 1 unit
5. Guarantee Card 1 unit
Note :
Only for Jupiter MX 135 / T135, We recommend to use our cable set to combine with the stock CDI to maintainthe sensor fan and faulty diagnostic features, it just Plug the cable set to stock’s CDI
and connector stock’s CDI
Wiring :
Wire Functions
The following charts describes what each wire of the CDI XP 301 MC is used for.
Red : + 12 Volt
Yellow : Coil
Blue : Pulser
Black * (can be added) Massa / Ground
Green : Tachometer
Note :
If your Motorcycle works with Double-Positive system, Please add Black Cable for Massa (Ground)Pulser to CDI XP 301 MC (see wiring diagram at back of CDI XP 301 MC), since from factory only install 1 (one) Black Cable (single – positive system).
What you have to do before installing CDI XP 301 MC:
1. Check the input voltage from the Battery, the voltage should be 12.5 volt
2. Check the Ignition system of your motorcycle, Is it AC or DC System? CDI XP 301 MC only works with DC system. If your motorcycle works with AC system a modification of input Supply power 12 Volt will be needed.
3. Connect the cable for CDI XP 301 MC as well, see the wiring diagram at CDI XP 301 MC
4. Ensure the type of CDI XP 301 MC as same as our recommended version (see table)
Procedures of Installation CDI XP 301 MC
1. Replace your existing CDI. (DO NOT COMBINE CDI XP 301 MC WITH ANY CDI / CDI XP
301 MC WORKS STAND ALONE) except Jupiter MX / T135 (Must be combined with stock CDI)
2. For the Motorcycles with AC Ignition System :
Connect the Cable +12 Volt DC from CDI XP 301 MC for Power Input Supply (Red Wire) to any cable that has 12,5 V DC that can be controlled by Ignition Switch ON or OFF.
For Instance : You can connect Red wire ( 12 VDc) to brake lamp wire with 12 Volt DC. Commonly wire brake lamp (12 V) can be controlled by Ignition Switch
Connect Pulser Cable (Blue), Massa (Black), Massa Pulser (Black), Coil (Yellow) from CDI XP 301 MC to the existing socket for CDI
For the Motorcycles with DC Ignition System :
Connnect +12 V (Red), Pulser Cable (Blue), Massa (Black), Massa pulser (Black),
Coil (Yellow) from CDI XP 301 MC to the existing socket for CDI
3. Turn the Ignition Switch to ON position, the indicator at CDI XP 301 MC will be turned ON to
Idle position (Yellow Light), if the indicator turn ON to Advance position (Red light), switch the Ignition Switch to OFF position and do some adjustment at adjuster to counterclockwise direction position with the supplied Adjuster tool. ANY MOVEMENT OF ADJUSTER ONLY BE DONE WITH ADJUSTER TOOL, BE CAREFULL PRESSURE COULD DAMAGE YOUR CDI’S ADJUSTER )
4. Crank the Motorcycle (If it does not work, check again the wiring connection at
your Motorcycles to make sure it’s connected well.
5. After the engine running well, adjust the advance timing to the RPM that you want to with the supplied adjuster tool !!
Setting the advancer
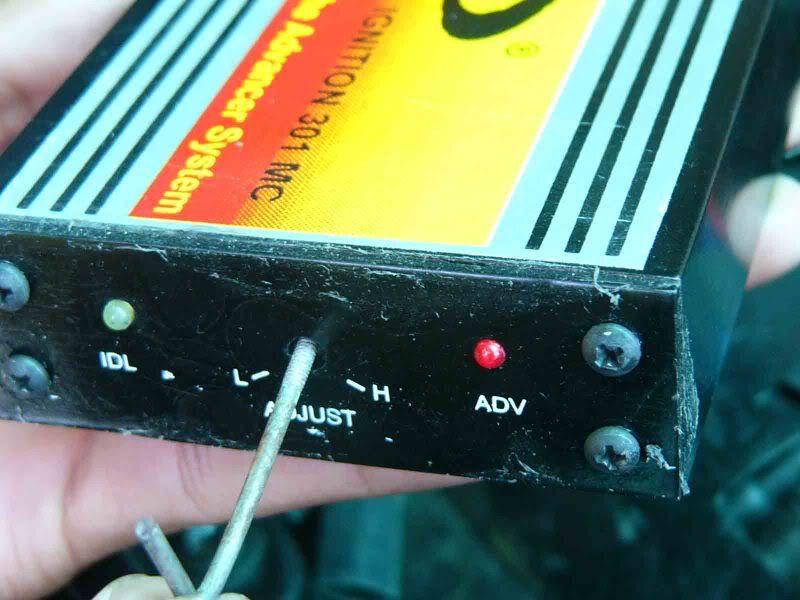
For Daily use:
Set the Engine’s rev by hold the accelerator hand grip at your motorcycle at RPM 3000 and turn the adjuster to Clockwise direction until you get the first time red light (Advance light) the degree of ignition will start to advance. Stop the turning!!
For Road Race :
Set the Engine’s rev by hold the accelerator hand grip at your motorcycle at RPM 2500 and turn the adjuster to Clockwise direction until you get the first time red light (Advance light) the degree of ignition will start to advance. Stop the turning!!
For Drag Bike :
Set the Engine’s rev by hold the accelerator hand grip at your motorcycle at RPM 1500 and turn the adjuster to Clockwise direction until you get the first time red light (Advance light) , the degree of ignition will start to advance. Stop the turning!!
Stop Turning after you get the advance Timing
* Above just some default setting, any advance timing is depend on the user preference.
6. Free the accelerator hand grip until the engine achieve it’s stationer rev, The indicator should
be Yellow light (idle position) it means the degree of ignition return to idle degree (14 Degree
BTDC), if you don’t get the Yellow light, turn the adjuster to counterclock wise direction until you
get the first yellow light (idle position)
7. Repeat step 5 and 6 until you get the best advance timing.
8. Set the seal tape at the adjuster until you get the best advance timing in order to avoid waters
penetration
The possibilities why CDI XP 301 MC does not work properly
1. Wiring is not connected well (Pulser Cable, +12 volt, Massa Cable and coil cable)
2. You are not using the recommended version of CDI XP 301 MC for your motorcycles.
3. Battery does not work properly, the output voltage should be 12.5 Volt
4. Wrong connected +12 V, causing the CDI XP 301 MC can not be cut-off from the Ignition
switch (ussualy happen at motorcycles with AC Ignition system).
5. The idle position (yellow light) can not be achieved after setting advance timing (Red
light) has been done , reduce your Rev engine at idle position by setting the Carburetor of your
motorcycle
TECH TIPS :
1. Coils : The CDI XP 301 MC will work with factory and most aftermarket coils. Better spark energy is received at the plug if lower resistance coils are used. However for more Ignition Output a XP Andrion Series CMC 2 A is recommended.
2. Spark Plug : The increased spark energy of the CDI XP 301 MC allows you to run a wider spark plug gap ( 1mm – 1.3 mm). The result is more predictable ignition and improve performance.
3. Main Jet / Pilot Jet Carburetor : Always improve the size of your Main Jet and Pilot Jet to avoid poor gasoline condition at your combustion engine due to high power ignition when using CDI XP 301 MC.
4. Advance timing : Please always adjust the Advance Timing at CDI XP 301 MC every time you have done any changes at Coils or Spark Plug because the CDI XP 301 MC will re-learn the correct advance timing.
* Every CDI XP 301 MC is designed with high power Toroid and has been tested with the ”life test
method” at RPM 30,000 for 2 hours.
Manual Book
CDI XP 301 MC ® ADVANCER SYSTEM
(Digital Adjustable Advancer Timing)
SPECIAL TECHNOLOGY FOR YOUR MOTORCYCLE’S PERFORMANCE
Always read this Instruction before Installation!!
Profile of CDI XP 301 MC
CDI XP 301 MC is a CDI (Capacitor Discharge Ignition) High Power Ignition with the output Voltage to Ignition coil 375 – 380 Volt which is controlled by AVR (Automatic Voltage Regulator) in order to control the output Voltage constant up to 40,000 RPM.
The CDI XP 301 MC works with the DC (Direct Current) input voltage system. The CDI is a combined Technology from Digital and Analog sytem called ”Manual Programmable Advancer System”.
The Advancer System will let the users to set when is the degree of Ignition will get advance at the RPM they want to (from 15 degree to 32 degree BTDC)
For instance : Advance timing at RPM 2000 the timing of Ignition's Characteristic will be different if it is compared to when the users want to Advance timing at RPM 3000.
There are two (2) Indicators at CDI they are Yellow (Idle Position) and Red (Advance Position). Each characteristic can be Programmed only by using small screw driver as well, this way is the same as if the users make program of Ignition characteristics by using PC (Personal Computer), it means no need to have PC, software etc.
By using CDI XP 301 MC not only for the Drag Bike but also for Road Race or Grass Track as well.
Versions of CDI XP 301 MC
Products of CDI XP 301 MC are divided based on the length of pick-up pulser sensor at Flywheel Magnet :
1. Ver 12 = Used for motorcycles with the length of pick up pulser at Flywheel Magnet 12 mm
2. Ver 14 = Length 14 mm
3. Ver 30 = Length 30 mm
4. Ver 38 = Length 38 mm
5. Ver 38 – X = Length 38 mm (Single Negative of Ignition’s System)
6. Ver 39 = Length 39 mm
7. Ver 57 = Length 57 mm
Specifications:
Symbol Parameter Value
Vdc Volt supply Minimum 9 Volt
Normal 12.5 Volt
Maximum 15 volt
I Dc Current Consumptions 0.15- 1.5 * Ampere
ω Revolution 800 – 40000 RPM
*) Depend on condition of Coil, gap of spark plug, etc
Type of Motorcycles and recommended version of CDI XP 301 MC
Type of Motorcycles Length of pick-up pulser sensor at Fly wheel Type of signal pulser Ignition System Recommended Versions of CDI XP 301 MC
1 HONDA
Kirana 12 ± 1 mm Single – Positive DC Ver 12
Supra / Legenda, Astrea Grand 12 ± 1 mm Single – Positive AC Ver 12
Tiger 2000 12 ± 1 mm Single – Positive AC Ver 12
Mega Pro 12 ± 1 mm Single – Positive DC Ver 12
Karisma / Wave 125 / Supra 125 X 38 ± 1 mm Single – Positive DC Ver 38
Sonic 125 / CBR 150 38 ± 1 mm Single – Negative DC Ver 38 - X
2. YAMAHA
Jupiter Z / Nouvo / Mio, Jupiter MX / T135 57.5 ± 1 mm Double - Positive DC Ver 57
Vega – R / 57.5 ± 1 mm Double - Positive AC Ver 57
3. SUZUKI
Smash 110 14 ± 1 mm Double - Positive DC Ver 14
Shogun 110 14 ± 1 mm Single - Positive DC Ver 14
Shogun 125 30 ± 1 mm Single - Positive DC Ver 30
Raider 150 / Satria 150 FU 39 ± 1 mm Double - Positive DC Ver 39
Each Package consist of :
1. CDI XP 301 MC unit : 1 unit
2. Adjuster Tool : 1 unit
3. Cable set : Red 1 unit, Yellow 1 unit, Blue 1 unit, Black 2 units, Green 1 unit (Only supplied for Ver 39) / For Jupiter MX we only supply it our cable set
4. Manual Book 1 unit
5. Guarantee Card 1 unit
Note :
Only for Jupiter MX 135 / T135, We recommend to use our cable set to combine with the stock CDI to maintainthe sensor fan and faulty diagnostic features, it just Plug the cable set to stock’s CDI
and connector stock’s CDI
Wiring :
Wire Functions
The following charts describes what each wire of the CDI XP 301 MC is used for.
Red : + 12 Volt
Yellow : Coil
Blue : Pulser
Black * (can be added) Massa / Ground
Green : Tachometer
Note :
If your Motorcycle works with Double-Positive system, Please add Black Cable for Massa (Ground)Pulser to CDI XP 301 MC (see wiring diagram at back of CDI XP 301 MC), since from factory only install 1 (one) Black Cable (single – positive system).
What you have to do before installing CDI XP 301 MC:
1. Check the input voltage from the Battery, the voltage should be 12.5 volt
2. Check the Ignition system of your motorcycle, Is it AC or DC System? CDI XP 301 MC only works with DC system. If your motorcycle works with AC system a modification of input Supply power 12 Volt will be needed.
3. Connect the cable for CDI XP 301 MC as well, see the wiring diagram at CDI XP 301 MC
4. Ensure the type of CDI XP 301 MC as same as our recommended version (see table)
Procedures of Installation CDI XP 301 MC
1. Replace your existing CDI. (DO NOT COMBINE CDI XP 301 MC WITH ANY CDI / CDI XP
301 MC WORKS STAND ALONE) except Jupiter MX / T135 (Must be combined with stock CDI)
2. For the Motorcycles with AC Ignition System :
Connect the Cable +12 Volt DC from CDI XP 301 MC for Power Input Supply (Red Wire) to any cable that has 12,5 V DC that can be controlled by Ignition Switch ON or OFF.
For Instance : You can connect Red wire ( 12 VDc) to brake lamp wire with 12 Volt DC. Commonly wire brake lamp (12 V) can be controlled by Ignition Switch
Connect Pulser Cable (Blue), Massa (Black), Massa Pulser (Black), Coil (Yellow) from CDI XP 301 MC to the existing socket for CDI
For the Motorcycles with DC Ignition System :
Connnect +12 V (Red), Pulser Cable (Blue), Massa (Black), Massa pulser (Black),
Coil (Yellow) from CDI XP 301 MC to the existing socket for CDI
3. Turn the Ignition Switch to ON position, the indicator at CDI XP 301 MC will be turned ON to
Idle position (Yellow Light), if the indicator turn ON to Advance position (Red light), switch the Ignition Switch to OFF position and do some adjustment at adjuster to counterclockwise direction position with the supplied Adjuster tool. ANY MOVEMENT OF ADJUSTER ONLY BE DONE WITH ADJUSTER TOOL, BE CAREFULL PRESSURE COULD DAMAGE YOUR CDI’S ADJUSTER )
4. Crank the Motorcycle (If it does not work, check again the wiring connection at
your Motorcycles to make sure it’s connected well.
5. After the engine running well, adjust the advance timing to the RPM that you want to with the supplied adjuster tool !!
Setting the advancer
For Daily use:
Set the Engine’s rev by hold the accelerator hand grip at your motorcycle at RPM 3000 and turn the adjuster to Clockwise direction until you get the first time red light (Advance light) the degree of ignition will start to advance. Stop the turning!!
For Road Race :
Set the Engine’s rev by hold the accelerator hand grip at your motorcycle at RPM 2500 and turn the adjuster to Clockwise direction until you get the first time red light (Advance light) the degree of ignition will start to advance. Stop the turning!!
For Drag Bike :
Set the Engine’s rev by hold the accelerator hand grip at your motorcycle at RPM 1500 and turn the adjuster to Clockwise direction until you get the first time red light (Advance light) , the degree of ignition will start to advance. Stop the turning!!
Stop Turning after you get the advance Timing
* Above just some default setting, any advance timing is depend on the user preference.
6. Free the accelerator hand grip until the engine achieve it’s stationer rev, The indicator should
be Yellow light (idle position) it means the degree of ignition return to idle degree (14 Degree
BTDC), if you don’t get the Yellow light, turn the adjuster to counterclock wise direction until you
get the first yellow light (idle position)
7. Repeat step 5 and 6 until you get the best advance timing.
8. Set the seal tape at the adjuster until you get the best advance timing in order to avoid waters
penetration
The possibilities why CDI XP 301 MC does not work properly
1. Wiring is not connected well (Pulser Cable, +12 volt, Massa Cable and coil cable)
2. You are not using the recommended version of CDI XP 301 MC for your motorcycles.
3. Battery does not work properly, the output voltage should be 12.5 Volt
4. Wrong connected +12 V, causing the CDI XP 301 MC can not be cut-off from the Ignition
switch (ussualy happen at motorcycles with AC Ignition system).
5. The idle position (yellow light) can not be achieved after setting advance timing (Red
light) has been done , reduce your Rev engine at idle position by setting the Carburetor of your
motorcycle
TECH TIPS :
1. Coils : The CDI XP 301 MC will work with factory and most aftermarket coils. Better spark energy is received at the plug if lower resistance coils are used. However for more Ignition Output a XP Andrion Series CMC 2 A is recommended.
2. Spark Plug : The increased spark energy of the CDI XP 301 MC allows you to run a wider spark plug gap ( 1mm – 1.3 mm). The result is more predictable ignition and improve performance.
3. Main Jet / Pilot Jet Carburetor : Always improve the size of your Main Jet and Pilot Jet to avoid poor gasoline condition at your combustion engine due to high power ignition when using CDI XP 301 MC.
4. Advance timing : Please always adjust the Advance Timing at CDI XP 301 MC every time you have done any changes at Coils or Spark Plug because the CDI XP 301 MC will re-learn the correct advance timing.
* Every CDI XP 301 MC is designed with high power Toroid and has been tested with the ”life test
method” at RPM 30,000 for 2 hours.

 well, have to admit i am new to bike modification, but how you guys know when the rpm is either at 3000, 2500 or 1500.


